This is an old revision of the document!
Super Nintendo Entertainment System / Super Famicom
Introduction
Dumping SNES / SFC cartridges require the use of a specialized dumper hardware that supports the cartridges, not to mention these dumpers may not be able to dump every single kind of cartridges.
Cartridges that contain the SA-1 Chip may not able to work because of its anti-piracy measures, be sure to read about the methods that support it.
Some cartridges may also be not supported because of its memory mapping like Sufami Turbo and Satellaview compatible cartridges (like BS-X), or like game prototypes that don't contain proper info about the cartridge itself.
Identifying Game Versions
todo: add info on cart/box serials (and non-standard carts if relevant)
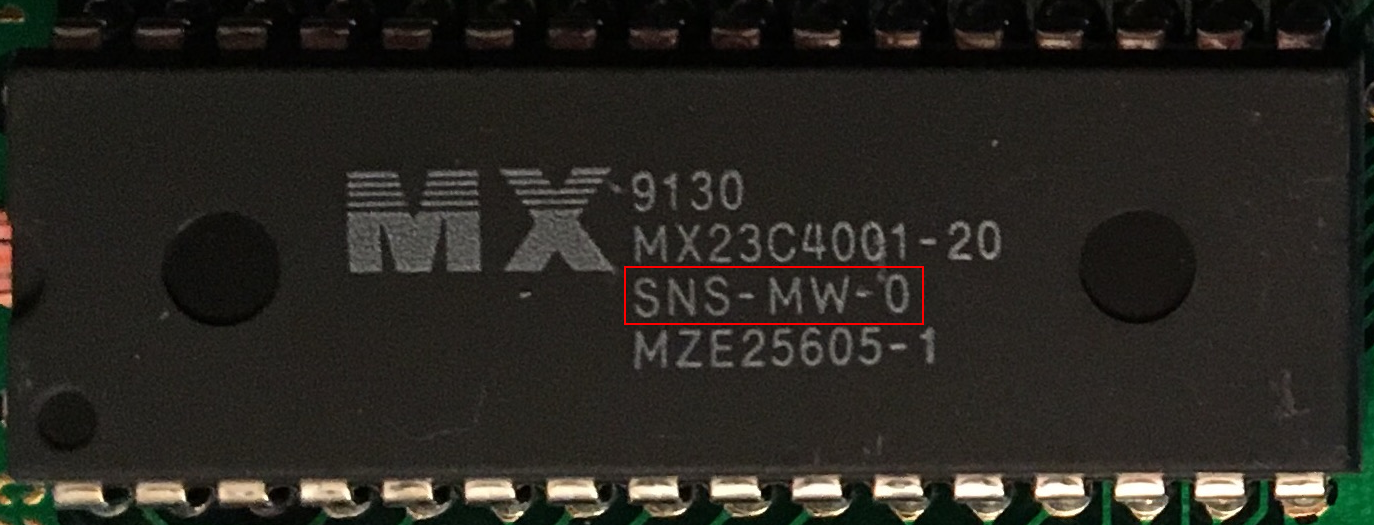
SSS(S)-GG(GG)-V
S = System/Region (SHVC = Super Famicom/Japan/World, SNS = USA SNES, SPAL = Europe SNES)
G = Game code (e.g. MW = Super Mario World)
V = Version (starts at 0)
Methods
- InfiniteNesLives Retro Programmer
- Retrode
- Super UFO Pro 8
- Copiers
Method 1 - Sanni Cart Reader
The Sanni Cart Reader (https://github.com/sanni/cartreader) is an open source Arduino based dumper that supports several systems, including SNES. It is portable, can be customized and does not need a computer to work.
Only a SD card is needed. Follow the instructions here on how to update the firmware of your Cart Reader.
If the Sanni Cart Reader is equipped with a snesCIC and Adafruit Clock Generator, it is possible to dump cartridges with embedded SA-1 chip.
Dumping Regular Cartridges
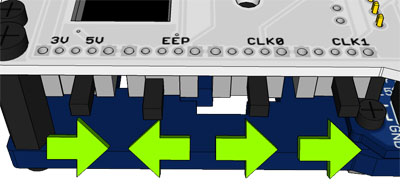
- Unplug the power from the hardware. Please make sure the switches on the side are set like this before doing anything:
Set the 3V/5V switch to the right, EEP to the left, CLK0 to the right, CLK1 to the right.
- Insert a FAT32 formatted SD Card.
- Insert the cartridge, make sure it is facing to the small screen.
- Plug the hardware to power it on.
- Use the left button to select Super Nintendo, then push the right button to select it.
- You will have a list of Super Nintendo cartridge hardware, select Super Nintendo again.
- The hardware will now detect the cartridge. If it could not recognize the cartridge, please power off the hardware by unplugging, remove the cartridge and insert it again and restart. The LED will be red if it didn't recognize, and the LED will be green if it works.
- Select “Read Rom” to dump the ROM, or select “Read Save" to dump the save to your SD card.
- As it does the job, please do not touch the cartridge, SD card, or the Cart Reader. Any interference might cause problems.
- Once it is done dumping, it will verify the ROM dump itself using the internal checksum information. Mind that this information is lacking in precision and is only useful short term. It is still preferable to properly verify your ROM dump using other means.
- If you are done, please unplug the hardware and you can use the SD card to get the ROM image.
Method 2 - Super NT / CopySNES
The Super NT from Analogue doesn't come with dumping capabilities by default, they need to be enabled by installing the jailbreak.
With the jailbreak installed the dumping process is pretty straight forward:
- Power the system off
- Insert cartridge
- Power the system on
- Select CopySNES on the tools menu
CopySNES will query the cartridge and grab the header and attempt to detect what kind of cartridge it is.
You have two options at this point:
- accept the settings and proceed to dumping
- edit the detected settings
If you wish to edit the settings, use up and down to select one of the settings, then use left and right to adjust it. You can select between 32 kilobytes and 16 megabytes of ROM to dump, and between 0 (i.e. none) and 32 kilobytes of RAM.
Finally, you can select the type of mapper it is, i.e. LOROM, HIROM, EXHIROM, or EXLOROM. There is also a FLAT setting which will let you dump the entire SNES cartridge space if desired. FLAT starts at address 00:0000 and will dump the specified amount of memory.
This manual mode is useful when dumping things that do not have a valid or any header such as the Game Genie BIOS (it reports 0 kilobyte of ROM and is actually 64 kilobytes) or the Sufami Turbo (again, it reports 0 kilobyte of ROM even though it's really 1 megabyte).
When you are done adjusting the settings, and are ready to dump, hit Select.
Filename entry:
CopySNES will directly copy the ROM header name as filename, however for some Japanese titles there may be no valid ASCII characters in the header (or if there's no header at all) so any invalid characters for a filename are replaced with spaces. If there's no name at all, it will default to “GAME”.
If you want to change the filename use up/down to change the character's value and left/right to select a character. Press enter to accept the filename and begin the dumping process.
The game's actual size will be determined at this point (i.e. a 2-megabyte game reported in the header might only be 1.5 megabytes, so this will be detected now).
Finally, the ROM and RAM are dumped to the SD card.
Now that the dump is complete, you are returned to the tools menu. The system can be powered off and a new cartridge inserted to dump by repeating the process above.
The following things have been tested (as of March 7, 2021):
- LOROM (ROM + RAM)
- HIROM (ROM + RAM)
- EXHIROM (ROM + RAM)
- SDD-1 (ROM + RAM)
- SA-1 (ROM + RAM)
- CX4 (ROM)
- DSP1-4 (ROM + RAM)
- S-RTC (ROM, RAM is dumped but it is unknown if it works)
- ST010 (ROM)
- ST011 (ROM)
- ST018 (ROM)
- OBC-1 (ROM + RAM)
- SPC7110 (ROM + RAM, but RAM has not been verified to work)
- GSU-1/2 (ROM + RAM)
(note: for SuperFX (GSU), the RAM is always dumped as 64 kilobytes. This is because games such as Yoshi's Island have RAM, but the headers for all the games show 0 kilobyte of RAM. This 'larger' RAM will work with the major emulators, and can be trimmed down later if needed.)
The information above is retrieved from https://github.com/SmokeMonsterPacks/Super-NT-Jailbreak, please see their GitHub repo for always up-to-date information about the Super NT jailbreak and CopySNES functionality.
Method 6 - RetroFreak
The RetroFreak is a great little emulation machine that uses physical carts similar to the Retron5.
Under standard conditions it is possible to let the RetroFreak copy the cart contents to an SD card, but they're always encrypted.
However, by using custom firmware and a few configurations to two files, you can get unencrypted dumps of your carts onto your SD card.
WARNING 1
Will this brick your system? Hopefully not. Proceed on your own risk.
Get the binaries
Start by downloading the release of hissori's retrofd project.
Make sure you get the release that's _smaller_ than your SD card. If your SD card is 16GB you should get the 8GB release, etc.
WARNING 2
This will overwrite your SD card, so make sure you make backups of anything important before proceeding.
Unpack the retrofd zip file, and then use something like balenaEtcher to transfer the contests onto an empty SD card.
Config
There are two small file edits that you need to do. To make it simple, you can replace the existing files on your SD card with the ones attached.
Here are the changed files:
retrofd.cfg
# clear micro SD partition 2/3
RF_CLR_SDP23=no
# FACTORY TEST MODE
RF_FTM=no
# Log copy daemon
RF_LOGCD=yes
rfd_logcd.sh
#!/sbin/busybox sh

while ! busybox grep "/mnt/external_sd" /proc/mounts > /dev/null
do
	busybox sleep 1
done

# copy log files(/mnt/ram/log/*) to SD(/retrofd/log) if new ones exist
srcd=/mnt/ram/
dstd=/mnt/external_sd/retrofd/log
while : ;
do
	busybox find $srcd -maxdepth 1 -type f | busybox sed -e 's/.*\///' | while read logfile
	do
		[ -f "$dstd/$logfile" ] || busybox sleep 5 && busybox cp "$srcd/$logfile" $dstd/
	done
	busybox sleep 1
done
Usage
Boot up the RetroFreak with the new SD card inserted, you should be able to use and play your carts like normal. Once you insert a cart, let RetroFreak install it to the SD card. Now start the game for a few seconds.
After you've started a game, the unencrypted dump will be copied onto your SD card under `/retrofd/log`. You can now exit the game and continue with the next cart.
Once you've turned off the RetroFreak, you can take out the SD card and look the contents and verify your unencrypted dumps.
They should have names such as `homebrewgame-decrypted.NES` and `awesomehomebrew-decrypted.SFC`.
Needs verification You might also be able to use the above method to dump an unencrypted BIOS of your Famicom Disk System. Plug in the RAM adapter and follow the instructions above to save the encrypted BIOS on your SD card. Then start an FDS game that you have loaded onto the SD card and the BIOS should be dumped into the same location as mentioned above.
Gathering Dump Info
Submitting Dump Info
If you aren't already registered, create an account on the forum. Once your account has been activated, post the info in the “New Dumps & Redumps” sub-forum.
Users with datter rights can submit the dump info directly to the database by using the “Submit” form in DAT-o-MATIC.
Minor contributions (No-Intro Wiki): Dizzzy, Hiccup, Wherewilf. Major contributions - initial Sanni Cart Reader instructions (dumping.guide): LuigiBlood. Minor contributions (dumping.guide): Hiccup.

